 |
| Category: Outdated LotRO InterfacesBlack Glass Mix 1.2b optional pak 1 |
This file is a Addon for Black Glass Mix by Brygard2007. You must have that installed before this Addon will work.
New Ui skins
|
| |
Fervor and focus colors to choose from
|
| |
April 18 2008
Update Information about the bar 3.
Bar 3 hides underneath the main bar.
This has been a problem for long time.
There nothing I can do about it.
Hopefully Turbine can fix it later date.
If your using the solid color toolbar and the bar 3 is hidden underneath.
You will have to CTRL+\ to bring up the movable frame to un hide it,or put a skill in one of the shortcut that you know where the hidden bar 3 is at and click it bring it out underneath.
April 17 2008
Update Information about the skindefinition file code.
When adding a code to the skindefintion file,I recommend to leave one blank
space on each line of the starting code.
For some reason when a code that starts on the beginning it wont read or detect.
Feb 26 2008
Update Info about different resolution and fervor bar and focus.
Its quite possible to use it for all resolutions.
The Guide
To be able to use the fervor bars,you would need to use one of the resolution toolbar
letterbox_bottom.tga.
Choose the toolbar that is close to your resolution and the xml code thats close to your resolution
you will need to edit the xml code,I will provide a guide below how to.
For instance if your running a resolution of 1152x864
choose the toolbar 1024x768
letterbox_bottom.tga
and the code with that resolution toolbar folder in the zip pak.
The code below will be a 1024x768 resolution example.You will have to edit some of the codes
for your resolutions.
Ok about the codes now,edit the following codes.
It will tell the toolbar to strech across the screen.
Edit the width=1024" to your resolution,for instance a Width="1152"
Now some resolution the toolbar will be shorter on the right side edge of the screen,
just add a 2 or more values intill the toolbar is strecth accross the screen completly
like:
Width="1554"
<Element ID="ToolbarField" X="0" Y="847" Width="1024" Height="203" Detach="1">
<Element ID="ToolbarFieldMain" X="0" Y="122" Width="1024" Height="85">
</Element>
<Element ID="LevelMeter" X="0" Y="184" Width="1024" Height="30">
<Element ID="LevelMeterFill" X="0" Y="12" Width="1024" Height="6">
<Element ID="LevelMeter_BonusMeter" X="0" Y="0" Width="1024" Height="6">
</Element>
</Element>
<Element ID="ToolbarButton_LevelUpXP_TutorialHighlight" X="0" Y="10" Width="1024" Height="10">
</Element>
<Element ID="ToolbarButton_Experience_TutorialHighlight" X="0" Y="10" Width="1024" Height="10">
</Element>
<Element ID="LevelMeterText" X="1" Y="10" Width="1024" Height="10">
</Element>
</Element>
================================================== ===============================================
Now about the attack button,the code below the attack button is enable on and its
middle of the screen for resolution 1024x768.
You will need to edit the x="481" to either higher values to move it to right side or
lower values to move it left side intill your desire location,a x="1" will be at edge of the screen left side.
And the Y="20" will move it up or down.
If you dont want the attack button enable to show on screen,set the
Width="62" and height="62" to a 1 on both.
<Element ID="AutoAttackIndicatorButton" X="481" Y="20" Width="62" Height="62">
</Element>
<Element ID="ViolentModeIndicator" X="481" Y="20" Width="62" Height="62">
</Element>
<Element ID="ToolbarButton_AutoAttack_TutorialHighlight" X="481" Y="20" Width="62" Height="62">
</Element>
================================================== ===============================================
Now about the fervor bar and focus.
Need to edit the X="303" and Y="104" same steps as the attack button, intill your desire location.
Note:
Do not edit the width and height.
<Element ID="GamePlay_FervorPipDisplay" X="303" Y="104" Width="417" Height="18">
</Element>
<Element ID="GamePlay_AimPipDisplay" X="303" Y="104" Width="417" Height="18">
</Element>
================================================== ===============================================
Now about the buttons menu and the bags.
Edit X="150" and Y="168" and the rest of the code intill desire locations.
Note:
Do not edit the width and height.
If you dont want the buttons to show up onscreen at all,then you can edit the
Width="30" and Height="30" to 1.
<Element ID="ToolBarButton_MainMenu" X="150" Y="168" Width="30" Height="30">
</Element>
<Element ID="ToolbarButton_Crafting" X="120" Y="168" Width="30" Height="30">
</Element>
<Element ID="ToolbarButton_Social" X="90" Y="168" Width="30" Height="30">
</Element>
<Element ID="ToolbarButton_Accomplishment" X="60" Y="168" Width="30" Height="30">
</Element>
<Element ID="ToolBarButton_Quest" X="30" Y="168" Width="30" Height="30">
</Element>
<Element ID="ToolbarButton_Journal" X="1" Y="168" Width="30" Height="30">
</Element>
<Element ID="ToolbarButton_Inventory" X="875" Y="168" Width="30" Height="30">
</Element>
<Element ID="ToolBarButton_Inventory2" X="905" Y="168" Width="30" Height="30">
</Element>
<Element ID="ToolBarButton_Inventory3" X="935" Y="168" Width="30" Height="30">
</Element>
<Element ID="ToolBarButton_Inventory4" X="965" Y="168" Width="30" Height="30">
</Element>
<Element ID="ToolBarButton_Inventory5" X="995" Y="168" Width="30" Height="30">
</Element>
================================================== ===============================================
Now the last code is the main bar.
The main bar is the 12 button quick slot from 1 to = keys.
Edit the X="300" to move it left or right.
The Y="158" will move it up or down.
<Element ID="Toolbar_Quickslot" X="300" Y="158" Width="420" Height="35">
</Element>
</Element>
</PanelFile>
================================================== ===============================================
The complete code to paste for skin definition file this is for resolution 1024x768 example.
Or use one the code in the zip pak that is closes to your resolution.
Skip one line after <!--By Brygard2007-->
<PanelFile ID="toolbar">
<Element ID="ToolbarField" X="0" Y="847" Width="1024" Height="203" Detach="1">
<Element ID="ToolbarFieldMain" X="0" Y="122" Width="1024" Height="85">
</Element>
<Element ID="LevelMeter" X="0" Y="184" Width="1024" Height="30">
<Element ID="LevelMeterFill" X="0" Y="12" Width="1024" Height="6">
<Element ID="LevelMeter_BonusMeter" X="0" Y="0" Width="1024" Height="6">
</Element>
</Element>
<Element ID="ToolbarButton_LevelUpXP_TutorialHighlight" X="0" Y="10" Width="1024" Height="10">
</Element>
<Element ID="ToolbarButton_Experience_TutorialHighlight" X="0" Y="10" Width="1024" Height="10">
</Element>
<Element ID="LevelMeterText" X="1" Y="10" Width="1024" Height="10">
</Element>
</Element>
<Element ID="AutoAttackIndicatorButton" X="481" Y="20" Width="1" Height="1">
</Element>
<Element ID="ViolentModeIndicator" X="481" Y="20" Width="1" Height="1">
</Element>
<Element ID="ToolbarButton_AutoAttack_TutorialHighlight" X="481" Y="20" Width="1" Height="1">
</Element>
<Element ID="GamePlay_FervorPipDisplay" X="303" Y="104" Width="417" Height="18">
</Element>
<Element ID="GamePlay_AimPipDisplay" X="303" Y="104" Width="417" Height="18">
</Element>
<Element ID="ToolBarButton_MainMenu" X="150" Y="168" Width="30" Height="30">
</Element>
<Element ID="ToolbarButton_Crafting" X="120" Y="168" Width="30" Height="30">
</Element>
<Element ID="ToolbarButton_Social" X="90" Y="168" Width="30" Height="30">
</Element>
<Element ID="ToolbarButton_Accomplishment" X="60" Y="168" Width="30" Height="30">
</Element>
<Element ID="ToolBarButton_Quest" X="30" Y="168" Width="30" Height="30">
</Element>
<Element ID="ToolbarButton_Journal" X="1" Y="168" Width="30" Height="30">
</Element>
<Element ID="ToolbarButton_Inventory" X="875" Y="168" Width="30" Height="30">
</Element>
<Element ID="ToolBarButton_Inventory2" X="905" Y="168" Width="30" Height="30">
</Element>
<Element ID="ToolBarButton_Inventory3" X="935" Y="168" Width="30" Height="30">
</Element>
<Element ID="ToolBarButton_Inventory4" X="965" Y="168" Width="30" Height="30">
</Element>
<Element ID="ToolBarButton_Inventory5" X="995" Y="168" Width="30" Height="30">
</Element>
<Element ID="Toolbar_Quickslot" X="300" Y="158" Width="420" Height="35">
</Element>
</Element>
</PanelFile>
================================================== ================================================== =======
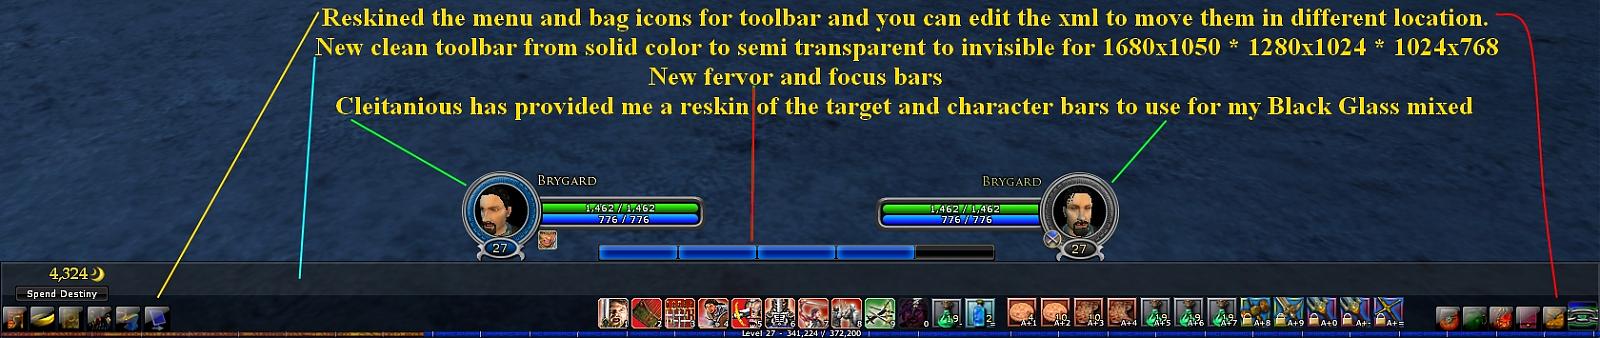
This is a optional pak for Black Glass Mix 1.2b
New icons from menu and bag buttons for the toolbar area and can be edit to be moved around in diffrent locations
please read the read me's.
================================================== ================================================== =======
Cleitanious has provided me a reskin of the vitals.
Special thank you Cleitanious!!!
================================================== ================================================== =======
New clean toolbars from solid colors to semi transparent to invisible and the main bar is in middle
of the screen with no attack button as defaulted.
The attack button can be re enable on and moved around if you edit the codes.
================================================== ================================================== =======
New fervor and focus bars with different colors to choose from,
from solid 4 colors of:
Blue
Red
Green
Purple
And bright glow colors same type as above.
And included the proto type bars colors to those that may asked for it.
Fervor bar can be moved around if you edit the code.
================================================== ================================================== =======
Special thanks to:
BaaIZebub, I looked at his xml code to learn how to move the toolbars and buttons based on his Dark UI @
http://www.lotrointerface.com/downloads/info153-DarkUI.html
And codes from Cleitanious help post on my UI section comments.Thanks!!!
Cleitanious UI are @
http://www.lotrointerface.com/downloads/info126-KWSCleanUI.html
================================================== ================================================== =======
Later date I will release a optional pak 2 that will include
vital bars of my design.
Quest bookmarks and deeds.
And other misc UI that I haven't done yet.
================================================== ================================================== =======
I would like to thank to
http://www.lotrointerface.com
for hosting my UI's.
Would like to thank to all the authors out there.
Special thanks to the moderators.
Special thanks to everybody that has downloaded my UI!!!
One last special special thanks to Frosty for providing us the new UI art for book 12!!!
P.S
Please forgive my typos...
|
| File Statistics |
| User Rating: |
|
| Downloads: |
7832 |
| Views: |
32528 |
| Favorites: |
2 |
| Uploaded By: |
|
| Last Modified: |
04-18-2008 01:18 PM by Brygard2007 |
|
|  |
|
 |
|
 02-25-2008, 09:24 PM
|
|
The Undying
Forum posts: 92
File comments: 42
Uploads: 6
|
Very cool looking, but I really have no idea how to get the new fervour bar and its location to work with my UI  |


|


|
|
02-25-2008, 10:58 PM
|
|
The Undying
Forum posts: 183
File comments: 403
Uploads: 49
|
Need to edit you xml code that effects the fervor bar.
the x="433" and the Y="104" the code below is for 1280 resolution,i use it for example.
<PanelFile ID="toolbar">
<Element ID="ToolbarField" X="0" Y="847" Width="1282" Height="203" Detach="1">
<Element ID="ToolbarFieldMain" X="0" Y="122" Width="1282" Height="85">
</Element>
<Element ID="LevelMeter" X="0" Y="184" Width="1280" Height="30">
<Element ID="LevelMeterFill" X="0" Y="12" Width="1280" Height="6">
<Element ID="LevelMeter_BonusMeter" X="0" Y="0" Width="1280" Height="6">
</Element>
</Element>
<Element ID="ToolbarButton_LevelUpXP_TutorialHighlight" X="0" Y="10" Width="1280" Height="10">
</Element>
<Element ID="ToolbarButton_Experience_TutorialHighlight" X="0" Y="10" Width="1280" Height="10">
</Element>
<Element ID="LevelMeterText" X="1" Y="10" Width="1280" Height="10">
</Element>
</Element>
<Element ID="AutoAttackIndicatorButton" X="611" Y="20" Width="1" Height="1">
</Element>
<Element ID="ViolentModeIndicator" X="611" Y="20" Width="1" Height="1">
</Element>
<Element ID="ToolbarButton_AutoAttack_TutorialHighlight" X="611" Y="20" Width="1" Height="1">
</Element>
<Element ID="GamePlay_FervorPipDisplay" X="433" Y="104" Width="417" Height="18">
</Element>
<Element ID="GamePlay_AimPipDisplay" X="433" Y="104" Width="417" Height="18">
</Element>
<Element ID="ToolBarButton_MainMenu" X="150" Y="94" Width="30" Height="30">
</Element>
<Element ID="ToolbarButton_Crafting" X="120" Y="94" Width="30" Height="30">
</Element>
<Element ID="ToolbarButton_Social" X="90" Y="94" Width="30" Height="30">
</Element>
<Element ID="ToolbarButton_Accomplishment" X="60" Y="94" Width="30" Height="30">
</Element>
<Element ID="ToolBarButton_Quest" X="30" Y="94" Width="30" Height="30">
</Element>
<Element ID="ToolbarButton_Journal" X="1" Y="94" Width="30" Height="30">
</Element>
<Element ID="ToolbarButton_Inventory" X="1130" Y="94" Width="30" Height="30">
</Element>
<Element ID="ToolBarButton_Inventory2" X="1160" Y="94" Width="30" Height="30">
</Element>
<Element ID="ToolBarButton_Inventory3" X="1190" Y="94" Width="30" Height="30">
</Element>
<Element ID="ToolBarButton_Inventory4" X="1220" Y="94" Width="30" Height="30">
</Element>
<Element ID="ToolBarButton_Inventory5" X="1250" Y="94" Width="30" Height="30">
</Element>
<Element ID="Toolbar_Quickslot" X="430" Y="158" Width="420" Height="35">
</Element>
</Element>
</PanelFile>
Since I can't run at 1440.
The X="433" will tell the fervor bar to move left or right
Try for start with 250 value it will move it at left side higher value moves it to right side fi Im not mistaken.
while the Y="104" tells it to move up or down.
the Y="104" should make the fervor bar basically above the toolbar of your code that you provide me from post of the My ui section comment.
the code below are the ones you need to look for and edit them.
Remember that classes like hunters uses focus and champion use fervor bars.
The classes that don't use any of the bars are like guardians and lore masters,
so the fervor bars don't show up in case you logged in on those classes.
<Element ID="GamePlay_FervorPipDisplay" X="433" Y="104" Width="417" Height="18">
</Element>
<Element ID="GamePlay_AimPipDisplay" X="433" Y="104" Width="417" Height="18">
P.s
don' edit the width or height,cause this codes will make the actual bars shrink cut them.
Or just add the code above with value at 250 on the X="433"
Your code from the other post show fervor bars at left side but your code has a -9 don't know this is correct just try 250 or 10.
<Element ID="GamePlay_FervorPipDisplay" X="-9" Y="-6" Width="90" Height="42"></Element>
<Element ID="GamePlay_AimPipDisplay" X="-9" Y="-6" Width="90" Height="42"></Element>
Last edited by Brygard2007 : 02-25-2008 at 11:11 PM.
|
|
|
|
|
02-26-2008, 03:58 AM
|
|
The Undying
Forum posts: 92
File comments: 42
Uploads: 6
|
Quote:
Need to edit you xml code that effects the fervor bar.
the x="433" and the Y="104" the code below is for 1280 resolution,i use it for example.
<PanelFile ID="toolbar">
<Element ID="ToolbarField" X="0" Y="847" Width="1282" Height="203" Detach="1">
<Element ID="ToolbarFieldMain" X="0" Y="122" Width="1282" Height="85">
</Element>
<Element ID="LevelMeter" X="0" Y="184" Width="1280" Height="30">
<Element ID="LevelMeterFill" X="0" Y="12" Width="1280" Height="6">
<Element ID="LevelMeter_BonusMeter" X="0" Y="0" Width="1280" Height="6">
</Element>
</Element>
<Element ID="ToolbarButton_LevelUpXP_TutorialHighlight" X="0" Y="10" Width="1280" Height="10">
</Element>
<Element ID="ToolbarButton_Experience_TutorialHighlight" X="0" Y="10" Width="1280" Height="10">
</Element>
<Element ID="LevelMeterText" X="1" Y="10" Width="1280" Height="10">
</Element>
</Element>
<Element ID="AutoAttackIndicatorButton" X="611" Y="20" Width="1" Height="1">
</Element>
<Element ID="ViolentModeIndicator" X="611" Y="20" Width="1" Height="1">
</Element>
<Element ID="ToolbarButton_AutoAttack_TutorialHighlight" X="611" Y="20" Width="1" Height="1">
</Element>
<Element ID="GamePlay_FervorPipDisplay" X="433" Y="104" Width="417" Height="18">
</Element>
<Element ID="GamePlay_AimPipDisplay" X="433" Y="104" Width="417" Height="18">
</Element>
<Element ID="ToolBarButton_MainMenu" X="150" Y="94" Width="30" Height="30">
</Element>
<Element ID="ToolbarButton_Crafting" X="120" Y="94" Width="30" Height="30">
</Element>
<Element ID="ToolbarButton_Social" X="90" Y="94" Width="30" Height="30">
</Element>
<Element ID="ToolbarButton_Accomplishment" X="60" Y="94" Width="30" Height="30">
</Element>
<Element ID="ToolBarButton_Quest" X="30" Y="94" Width="30" Height="30">
</Element>
<Element ID="ToolbarButton_Journal" X="1" Y="94" Width="30" Height="30">
</Element>
<Element ID="ToolbarButton_Inventory" X="1130" Y="94" Width="30" Height="30">
</Element>
<Element ID="ToolBarButton_Inventory2" X="1160" Y="94" Width="30" Height="30">
</Element>
<Element ID="ToolBarButton_Inventory3" X="1190" Y="94" Width="30" Height="30">
</Element>
<Element ID="ToolBarButton_Inventory4" X="1220" Y="94" Width="30" Height="30">
</Element>
<Element ID="ToolBarButton_Inventory5" X="1250" Y="94" Width="30" Height="30">
</Element>
<Element ID="Toolbar_Quickslot" X="430" Y="158" Width="420" Height="35">
</Element>
</Element>
</PanelFile>
Since I can't run at 1440.
The X="433" will tell the fervor bar to move left or right
Try for start with 250 value it will move it at left side higher value moves it to right side fi Im not mistaken.
while the Y="104" tells it to move up or down.
the Y="104" should make the fervor bar basically above the toolbar of your code that you provide me from post of the My ui section comment.
the code below are the ones you need to look for and edit them.
Remember that classes like hunters uses focus and champion use fervor bars.
The classes that don't use any of the bars are like guardians and lore masters,
so the fervor bars don't show up in case you logged in on those classes.
<Element ID="GamePlay_FervorPipDisplay" X="433" Y="104" Width="417" Height="18">
</Element>
<Element ID="GamePlay_AimPipDisplay" X="433" Y="104" Width="417" Height="18">
P.s
don' edit the width or height,cause this codes will make the actual bars shrink cut them.
Or just add the code above with value at 250 on the X="433"
Your code from the other post show fervor bars at left side but your code has a -9 don't know this is correct just try 250 or 10.
<Element ID="GamePlay_FervorPipDisplay" X="-9" Y="-6" Width="90" Height="42"></Element>
<Element ID="GamePlay_AimPipDisplay" X="-9" Y="-6" Width="90" Height="42"></Element>
|
Its -9 because the attack indicator was 0, and fervour bar is supposed to start to the left of it  |
|
|
|
|
02-26-2008, 06:18 AM
|
|
The Undying
Forum posts: 183
File comments: 403
Uploads: 49
|
So did you get it to work?
This weird about the fervor bar for you set it at -9.
I mean a 0 or 1 will make things at the edge of the screen to the left.
A negetave numbers would make it off screen to the left where it be hidden from site.
But if that worked for you then 
Last edited by Brygard2007 : 02-26-2008 at 06:18 AM.
|
|
|
|
|
02-26-2008, 08:14 AM
|
|
The Undying
Forum posts: 183
File comments: 403
Uploads: 49
|
I provide a guide above for people that are running in different resolutions.
Remember that to able to use the fervor bars you will need to use the xml code
and the toolbar in the zip.
I tested the tool bar of the resolution 1024 and the code above and it made the toolbar stretch across my screen of 1680.
So it should work for other resolutions too,but I can't confirm it.
So if anyone that are running in different resolution then whats provided in the zip
and the guide above worked for you,please let me know.
Thanks...
|
|
|
|
|
02-26-2008, 12:13 PM
|
|
The Undying
Forum posts: 92
File comments: 42
Uploads: 6
|
Quote:
So did you get it to work?
This weird about the fervor bar for you set it at -9.
I mean a 0 or 1 will make things at the edge of the screen to the left.
A negetave numbers would make it off screen to the left where it be hidden from site.
But if that worked for you then
|
I havnt gotten to play around witht his addon yet.
No -9 doesnt make it "hidden", it makes it 9 pixels to the left side of the display, which means it sits on top of the attack indicator properly instead of further to the right then it would be at 0. |
|
|
|
|
02-27-2008, 09:01 PM
|
|
The Undying
Forum posts: 92
File comments: 42
Uploads: 6
|
Unfortunately I cant get it to work right for my resolution
IMO, a set of .bat files that will automaticially make the xlm changes would work nicely for something like this. |
|
|
|
|
02-27-2008, 10:45 PM
|
|
The Undying
Forum posts: 183
File comments: 403
Uploads: 49
|
What sort of things you having problems with?
I don't know anything about bat files.
|
|
|
|
|
02-28-2008, 06:57 AM
|
|
The Undying
Forum posts: 92
File comments: 42
Uploads: 6
|
What sort of things you having problems with?
I don't know anything about bat files.
Well the new fervour bar, I cant get it to work right. Instead of it being one line of bubbles its like a pile of half bubbles smashed together.
With a bat file you could make 1 bat file for each part of the "addon" and resolution. Like "Fervour Bar@ 1440x900.bat" a .bat file can easily add the right lines of code to the end of your XML document.
|
|
|
|
|
02-28-2008, 09:50 AM
|
|
The Undying
Forum posts: 183
File comments: 403
Uploads: 49
|
Are the width and height set according below?
<Element ID="GamePlay_FervorPipDisplay" X="303" Y="104" Width="417" Height="18">
</Element>
<Element ID="GamePlay_AimPipDisplay" X="303" Y="104" Width="417" Height="18">
</Element>
Paste me your complete xml and see if I can spot something amiss.
About the bat files,I don't know how to make them at all.
I have seen bat file before and don't know if its permitted to include them.
Last edited by Brygard2007 : 02-28-2008 at 09:54 AM.
|
|
|
|
|
02-28-2008, 03:28 PM
|
|
The Undying
Forum posts: 92
File comments: 42
Uploads: 6
|
Quote:
Are the width and height set according below?
<Element ID="GamePlay_FervorPipDisplay" X="303" Y="104" Width="417" Height="18">
</Element>
<Element ID="GamePlay_AimPipDisplay" X="303" Y="104" Width="417" Height="18">
</Element>
Paste me your complete xml and see if I can spot something amiss.
About the bat files,I don't know how to make them at all.
I have seen bat file before and don't know if its permitted to include them.
|
I dont see how a bat file could be agaisnt the rules. That would be odd indeed.
But yeah, I had copied and pasted your lines from the Fervour Readme into my XML and moved it "down" more. But it was all of the way to the left of the screen, which means the X would have been 0 or less, but it wasnt. And the image itself wasnt displayed properly, and it was beign displayed when I didnt have any Fervour or Focus.
Last edited by Cleitanious : 02-28-2008 at 03:37 PM.
|
|
|
|
|
02-28-2008, 03:36 PM
|
|
The Undying
Forum posts: 92
File comments: 42
Uploads: 6
|
Last edited by Cleitanious : 02-28-2008 at 03:38 PM.
|
|
|
|
|
02-28-2008, 04:10 PM
|
|
The Undying
Forum posts: 183
File comments: 403
Uploads: 49
|
<Element ID="GamePlay_FervorPipDisplay" X="433" Y="104" Width="1" Height="1">
</Element>
<Element ID="GamePlay_AimPipDisplay" X="433" Y="104" Width="1" Height="1">
Your width and height are set to 1 need to changed them, this the error.
width should be 417 and height 18.
Code below is correct.
Code above is error.
Im going to relook at the zip pak to see if the codes are in error.
But the code below is correct one to use.
<Element ID="GamePlay_FervorPipDisplay" X="433" Y="104" Width="417" Height="18">
</Element>
<Element ID="GamePlay_AimPipDisplay" X="433" Y="104" Width="417" Height="18">
</Element>
|
|
|
|
|
02-28-2008, 04:26 PM
|
|
The Undying
Forum posts: 183
File comments: 403
Uploads: 49
|
I checked the zip pak and they are correct. I dont know how you got 1's for your fervor codes.
I don't know if you have read the info on the page of the small guide I provided up top,but heres the panel code for your xml.
I edit for your resolution and let me know if it works better.
Copy and replace the panel code.
<?xml version="1.0" encoding="UTF-8"?>
<opt>
<SkinName Name="Modded BlackGlassBlue V 1.2"></SkinName>
<!--By: Brygard2007-->
<PanelFile ID="toolbar">
<Element ID="ToolbarField" X="0" Y="847" Width="1440" Height="203" Detach="1">
<Element ID="ToolbarFieldMain" X="0" Y="5" Width="1440" Height="85">
</Element>
<Element ID="LevelMeter" X="0" Y="184" Width="1440" Height="30">
<Element ID="LevelMeterFill" X="0" Y="12" Width="1440" Height="6">
<Element ID="LevelMeter_BonusMeter" X="0" Y="0" Width="1440" Height="6">
</Element>
</Element>
<Element ID="ToolbarButton_LevelUpXP_TutorialHighlight" X="0" Y="10" Width="1440" Height="10">
</Element>
<Element ID="ToolbarButton_Experience_TutorialHighlight" X="0" Y="10" Width="1440" Height="10">
</Element>
<Element ID="LevelMeterText" X="1" Y="10" Width="1440" Height="10">
</Element>
</Element>
<Element ID="AutoAttackIndicatorButton" X="5" Y="20" Width="1" Height="1">
</Element>
<Element ID="ViolentModeIndicator" X="5" Y="20" Width="1" Height="1">
</Element>
<Element ID="ToolbarButton_AutoAttack_TutorialHighlight" X="5" Y="20" Width="1" Height="1">
</Element>
<Element ID="GamePlay_FervorPipDisplay" X="433" Y="104" Width="417" Height="18">
</Element>
<Element ID="GamePlay_AimPipDisplay" X="433" Y="104" Width="417" Height="18">
</Element>
<Element ID="ToolBarButton_MainMenu" X="150" Y="94" Width="1" Height="1">
</Element>
<Element ID="ToolbarButton_Crafting" X="120" Y="94" Width="1" Height="1">
</Element>
<Element ID="ToolbarButton_Social" X="90" Y="94" Width="1" Height="1">
</Element>
<Element ID="ToolbarButton_Accomplishment" X="60" Y="94" Width="1" Height="1">
</Element>
<Element ID="ToolBarButton_Quest" X="30" Y="94" Width="1" Height="1">
</Element>
<Element ID="ToolbarButton_Journal" X="1" Y="94" Width="1" Height="1">
</Element>
<Element ID="ToolbarButton_Inventory" X="1130" Y="94" Width="1" Height="1">
</Element>
<Element ID="ToolBarButton_Inventory2" X="1160" Y="94" Width="1" Height="1">
</Element>
<Element ID="ToolBarButton_Inventory3" X="1190" Y="94" Width="1" Height="1">
</Element>
<Element ID="ToolBarButton_Inventory4" X="1220" Y="94" Width="1" Height="1">
</Element>
<Element ID="ToolBarButton_Inventory5" X="1250" Y="94" Width="1" Height="1">
</Element>
<Element ID="Toolbar_Quickslot" X="70" Y="40" Width="420" Height="35">
</Element>
</Element>
</PanelFile>
Last edited by Brygard2007 : 02-28-2008 at 04:29 PM.
|
|
|
|
|
03-29-2008, 09:07 AM
|
|
The Wary
Forum posts: 0
File comments: 13
Uploads: 0
|
Wow, very nice Skin. I changed some thing after my fancy but not much (positions of some Buttons...)
But the Radar is unskinned, will there be a fix sometime?
Great work!
Last edited by schneidebrett : 03-30-2008 at 04:58 AM.
|
|
|
|
All times are GMT -5. The time now is 04:14 PM.
|
|


 02-25-2008, 09:24 PM


