|
|
|||||||


|
| |||||||||||||||||||||||||||||||||||||||||||||||||||||||||||||||||||||||||||||||||


 |
|
 03-18-2012, 02:37 AM
|
|||
|
The Undying
Forum posts: 172
File comments: 693
Uploads: 13
|
There are presently 2 up to date versions :
A standalone one managed by ElfHeart here : http://www.lotrointerface.com/downlo...itedAgain.html And another one I maintain within JRR (multi skins pack) here : http://www.lotrointerface.com/downloads/info581-JRR-AtributetoMiddleEarth.html Last edited by Adra : 03-18-2012 at 02:41 AM. |
||


|


|
|
11-20-2010, 01:17 PM
|
|||
|
The Wary
Forum posts: 0
File comments: 4
Uploads: 0
|
There is a totally up to date version here now.
|
||
|
|
|
|
03-01-2010, 05:34 PM
|
|||
|
The Undying
Forum posts: 104
File comments: 94
Uploads: 6
|
Hello,
as Eduardo isn't updating his UI, I took the liberty and time to do it for you. Have a look here |
||
|
|
|
|
02-21-2010, 04:29 AM
|
|||
|
The Wary
Forum posts: 1
File comments: 4
Uploads: 0
|
Nobody can't update this nice skin ?
 |
||
|
|
|

|
12-21-2009, 12:34 PM
|
|||
|
The Wary
Forum posts: 2
File comments: 4
Uploads: 0
|
Is there anybody with some UI editing experience who could remake this one for SoM. I gave the code a peek myself and tried to work with it but I didn't really manage to get it right (might be explained by the fact that I never made a ui before).
I think a lot of people would really appreciate this! (and I'm willing to give that person a cookie!) |
||
|
|
|
|
12-03-2009, 12:50 AM
|
|||
|
The Undying
Forum posts: 183
File comments: 403
Uploads: 49
|
You might want to ask him on his website also as far i know and been told he's working for a game company.
http://ledmirage.net/forums/ |
||
|
|
|
|
12-03-2009, 12:31 AM
|
|||
|
The Wary
Forum posts: 0
File comments: 4
Uploads: 0
|
Hi there LedM,
First of all, I'd like to tell you that I really enjoy the mini version of Eorlingas! I'm using it as my standard UI since a few months now. However, with Lotro SoM coming up, I was wondering if you were going to update it towards the new UI versions, or that I have to find meself a new UI... I'd really love too see Eorlingas updated with SoM, and looking forward to your reply, YT, Dalosir |
||
|
|
|
|
06-24-2009, 04:33 AM
|
|||
|
The Wary
Forum posts: 0
File comments: 2
Uploads: 1
|
First of all, Greaaat job !
 but, but,Problem: Load up game and self portrait looks fine. Yet, everytime I into a new area/zone/instance that requires the game to re-load the game the self portrait picture decreases in size - but the frame stays the same - it's just the picture. It does this until finally my self portrait frame is a big black dot where the picture of my character should be. Furthermore, since there is no picture of my character due to it disappearing slowly into infinity, I can no longer 'right-click' it to pull up the options menu - very annoying as a Fellowship/Raid Leader. Temp fix: re-log/restart game - not acceptable but it works, then reverts back to it's normal problem, picture slowly disappears after each screen re-load. Tried to re-install the mod, same problem. Even resetting the UI in the options menu back to "none" does not fix the problem, a re-log or restart is mandatory to fix it. Any idea what's wrong? |
||
|
|
|
|
06-05-2009, 12:12 PM
|
|||
|
The Wary
Forum posts: 1
File comments: 2
Uploads: 0
|
Re: MoM Legendary buttons
Fregrin,
It hasn't been outfitted for MoM yet - thats why some of the skins don't mesh correctly. When the client is updated for MoM, reinstall the skin and it will be fixed. Last edited by Arathlo : 06-05-2009 at 12:13 PM. |
||
|
|
|
|
05-18-2009, 04:44 PM
|
|||
|
The Wary
Forum posts: 0
File comments: 7
Uploads: 0
|
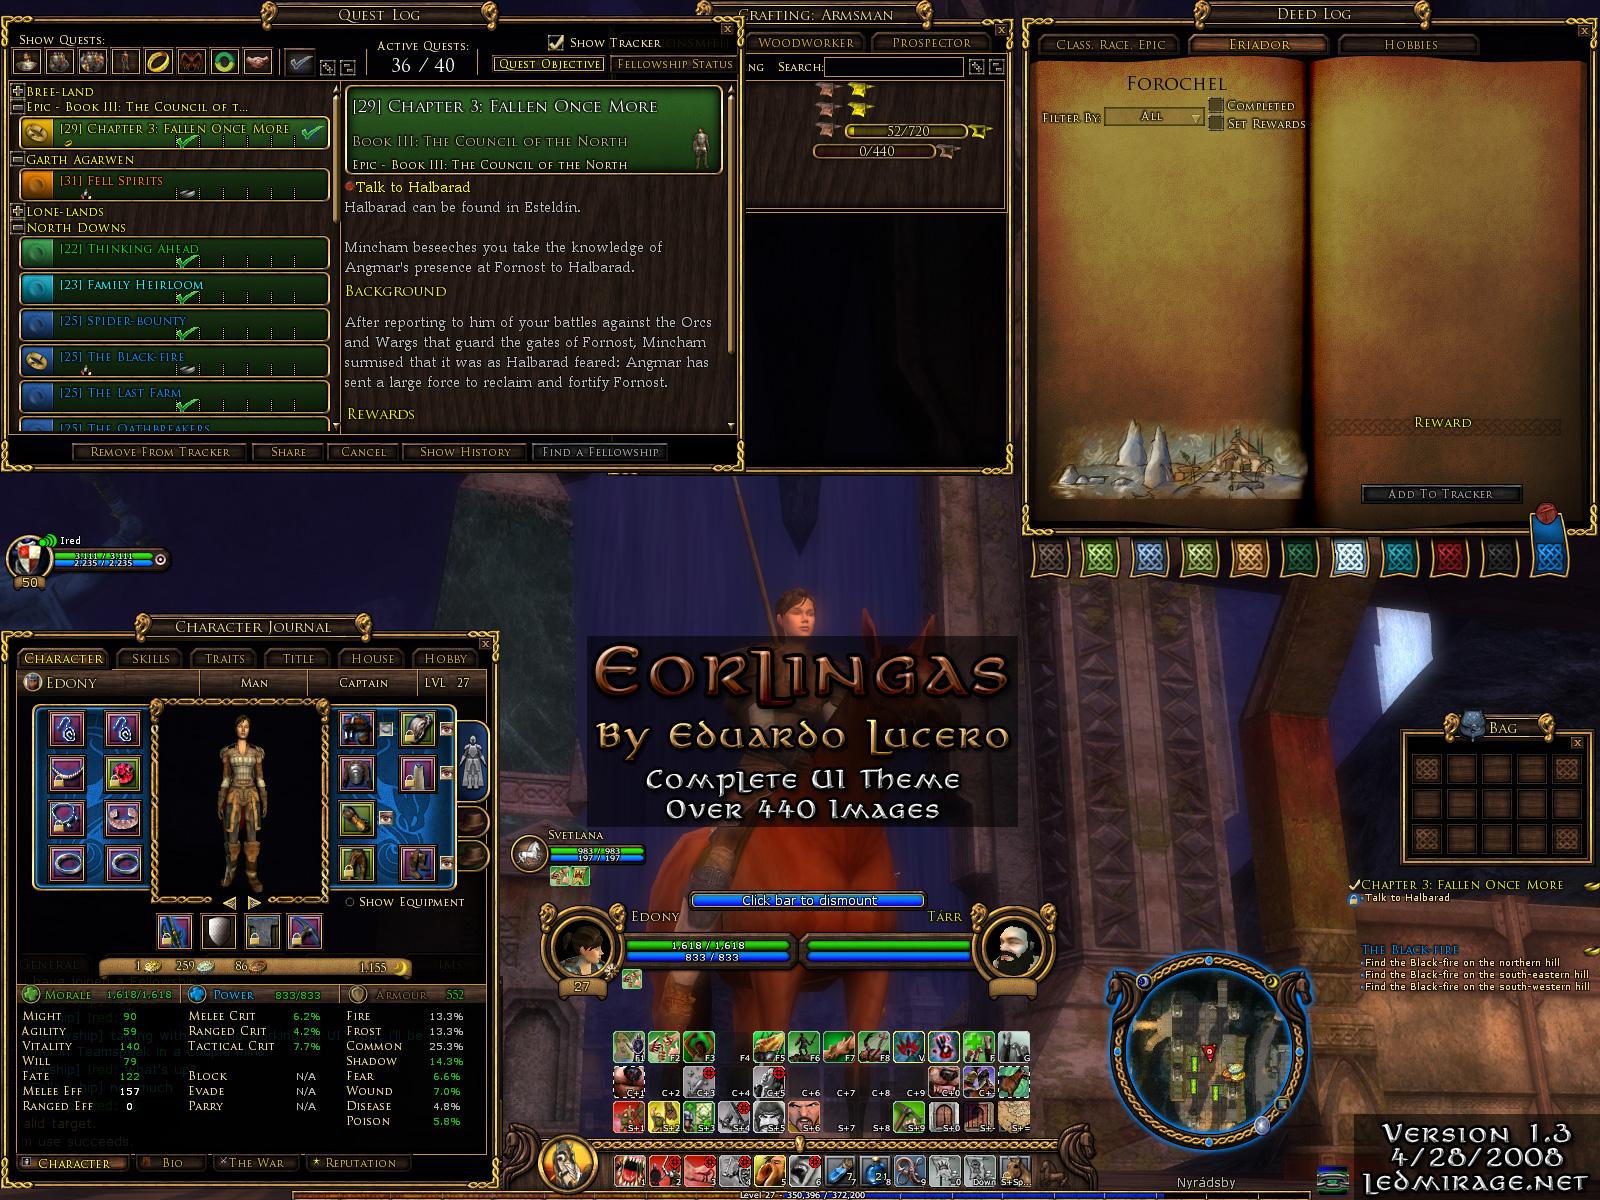
Love this contribution. I've never really liked any of the theme UIs and this one I fell in love with.
Thanks LM, using this one makes LotRO feel more authentic  I hope you don't drop this project as so far, it really is an inspiration. |
||
|
|
|
|
04-25-2009, 05:53 AM
|
|||
|
The Wary

Forum posts: 4
File comments: 14
Uploads: 0
|
MoM Legendary buttons
Hi,
can someone tell me how get rid those damn legendary buttons from mini toolbar version of this skin please. thanks. |
||
|
|
|
|
04-13-2009, 04:56 PM
|
|||
|
The Wary
Forum posts: 0
File comments: 1
Uploads: 0
|
This is my first custom UI for LOTRO, very nice job!
 |
||
|
|
|
|
03-03-2009, 10:03 AM
|
|||
|
The Wary
Forum posts: 1
File comments: 8
Uploads: 0
|
How much longer is soon.. *begs*
|
||
|
|
|
|
12-23-2008, 01:17 AM
|
|||
|
The Indomitable

Forum posts: 10
File comments: 31
Uploads: 3
|
Hey everyone, I am on holiday break and just picked up MOM tonight. I will be updating my themed UI sets soon! (TM)
|
||
|
|
|
|


All times are GMT -5. The time now is 09:07 AM.
|
© MMOUI
vBulletin® - Copyright ©2000 - 2024, Jelsoft Enterprises Ltd. |